
A geyser makes everyday life easier, especially during cold mornings when you need hot water for bathing, washing, or household chores. But like other home appliances, a geyser needs regular care to work safely and efficiently.
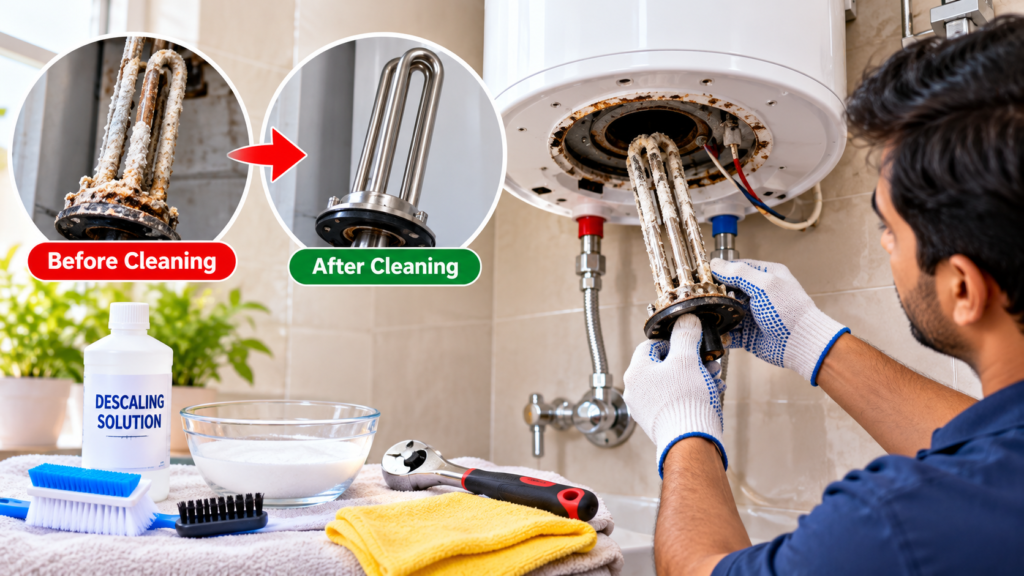
Over time, dust can collect on its outer surface, while minerals from hard water may build up inside the tank and around the heating element. In some homes, sediment can also collect at the bottom of the water heater. These deposits may affect heating performance and, depending on the appliance and water conditions, contribute to unusual noises or maintenance problems.
The good news is that you can handle some basic geyser-cleaning tasks at home. You can wipe the exterior, inspect accessible pipes for visible leaks, and keep the surrounding area clean. However, opening the appliance, draining hot water, removing the heating element, or cleaning internal components involves additional risks and should be done only according to the manufacturer’s instructions or by a qualified technician.
In this guide, you will learn how to clean a geyser at home, how to recognise limescale and sediment buildup, what tools you may need, how often cleaning is required, and when it is safer to call a professional.
Why Is Geyser Cleaning Important?
A geyser may continue to produce hot water even when it needs maintenance. That is why it is useful to pay attention to changes in heating performance, unusual sounds, leaks, or visible scale around connections.
Here are some reasons to keep your water heater clean and properly maintained.
1. Helps maintain heating performance
Mineral deposits can form on heating surfaces when water contains dissolved minerals. Heavy deposits may interfere with heat transfer in some water heaters. Proper maintenance helps address buildup before it becomes a larger problem.
2. Helps identify potential problems early
A regular visual inspection may reveal corrosion, loose-looking external fittings, water leakage, or damaged insulation. Finding these signs early can help you arrange repairs before the problem worsens.
Never attempt to tighten electrical connections or dismantle pressurised plumbing unless you are qualified to do so.
3. May reduce certain unusual noises
Some water heaters produce popping, crackling, or rumbling sounds when mineral deposits or sediment affect heating. These sounds can have other causes, too, so they should not automatically be blamed on scale.
If your geyser suddenly becomes noisy, arrange an inspection instead of trying to remove the deposits yourself.
4. Supports safer appliance operation
Cleaning alone cannot make a faulty geyser safe. Electrical protection, proper earthing, safe water pressure, working safety devices, and correct installation are also important.
Maintenance provides an opportunity to notice visible problems and have them checked by a qualified professional.
What Causes Dirt, Scale, and Sediment in a Geyser?
Before cleaning your geyser, it helps to understand what may be collecting inside it.
Dust and surface dirt: Dust, water marks, and bathroom residue can accumulate on the outer casing.
Limescale: Hard water contains dissolved minerals, including calcium and magnesium. When conditions cause these minerals to precipitate, they can form hard deposits on surfaces exposed to hot water.
Sediment: Small particles from the water supply may settle at the bottom of a storage water heater. The amount and type of sediment depend on the local water supply and the appliance.
Corrosion: Rust-like marks or discoloured water may indicate corrosion somewhere in the water system. These signs are not simply a cleaning problem and may require professional inspection.
What Do You Need to Clean a Geyser at Home?
For basic exterior cleaning, gather these items:
- A soft microfibre cloth
- A small bowl of clean water
- A mild cleaning solution suitable for the outer casing
- A dry, soft cloth
- A torch for visual inspection, if needed
For a simple exterior clean, you do not need to open the geyser or buy a special descaling chemical.
Avoid spraying water directly onto the appliance. Keep moisture away from switches, electrical connections, control panels, sockets, and cable entries. Never use abrasive pads or aggressive chemicals unless the manufacturer specifically permits them.
Internal tank flushing, descaling, and heating-element cleaning require different equipment and procedures. Do not improvise these steps using household acids, bleach, drain cleaners, or other chemicals.
How to Clean a Geyser at Home: Step-by-Step Guide
The safest way to begin is with the exterior. The following steps are suitable for basic household care and do not require opening the water heater.
Step 1: Read the manufacturer’s instructions
Check your geyser’s user manual before cleaning it. Different models have different casing materials, controls, maintenance requirements, and safety procedures.
Look for the manufacturer’s instructions about cleaning, service intervals, warning indicators, and approved cleaning products.
If you cannot find the manual, search the manufacturer’s official website using the model number printed on the appliance label.
Step 2: Switch off the geyser and let it cool
Turn off the geyser using its normal control. For an electric storage geyser, isolate the electrical supply using the appropriate switch or circuit breaker before cleaning near the appliance.
Wait until the appliance and its accessible surfaces have cooled. Hot water and metal components can cause burns.
If you are unsure how to isolate the supply safely, or if the switch, wiring, or casing appears damaged, do not proceed. Contact a qualified electrician or service technician.
For a gas geyser, follow the manufacturer’s shutdown instructions. Do not dismantle the gas supply, burner, flue, or combustion chamber.
Step 3: Clean the outside surface
Use a soft cloth that is only slightly damp. Wipe the outer casing gently to remove dust, fingerprints, and ordinary bathroom residue.
For stubborn marks, use a small amount of mild cleaner only if it is suitable for the appliance’s surface and approved by the manufacturer.
Do not pour water over the geyser, use a pressure washer, or allow moisture to enter the control panel or electrical openings.
Step 4: Wipe the controls and accessible areas carefully
Use a dry or barely damp cloth around accessible external controls and surfaces, following the manual’s cleaning instructions.
Do not spray cleaning liquid onto buttons, displays, switches, plugs, wiring, or sockets. Never insert objects into vents or openings.
If you see damaged insulation, exposed wiring, scorch marks, or water around electrical parts, stop using the appliance and arrange a professional inspection.
Step 5: Inspect the visible pipes and connections
Look at the accessible water pipes, valves, and the area underneath the geyser. Check for dripping water, unusual corrosion, damp patches, or staining.
This is a visual inspection only. Do not loosen pipe connections, remove safety valves, block discharge pipes, or attempt to repair a pressurised water system yourself.
If water is leaking from the tank or a fitting, follow the manufacturer’s emergency instructions and contact a qualified plumber or service technician.
Step 6: Keep the surrounding area dry and clear
Wipe away any water that has collected on nearby surfaces. Keep the area around the appliance clear enough for ventilation, inspection, and servicing.
For a gas geyser, never block required ventilation openings or the flue. Poor ventilation or faulty combustion can cause dangerous carbon monoxide exposure.
Step 7: Allow the appliance to dry completely
Make sure the exterior is dry before restoring normal use. Do not switch the appliance on if water may have entered its electrical components or if any fault has been noticed.
If you suspect moisture has entered the controls or wiring, leave the appliance switched off and get professional advice.
These steps clean the accessible exterior. They do not remove internal limescale or sediment from the tank.
How to Remove Limescale and Sediment From Inside a Geyser
If you suspect heavy internal scale or sediment, the next step is to check your model’s maintenance instructions and arrange the appropriate service.
Internal cleaning can involve isolating electricity or gas, shutting off the water supply, safely depressurising the system, draining hot water, and accessing internal components. Incorrect handling can cause scalding, leaks, electrical shock, pressure-related injury, or damage to the appliance.
Why professional descaling may be necessary
A qualified technician can assess whether the problem is caused by scale, sediment, a faulty thermostat, a heating element, a valve, or another component.
Depending on the model, the technician may recommend:
- Flushing sediment from a storage tank, where the manufacturer permits it.
- Removing and cleaning or replacing a scaled heating element.
- Inspecting the sacrificial anode, if the model uses one.
- Checking seals, valves, and other serviceable components.
- Using an approved descaling product and following the specified procedure.
- Testing the appliance after maintenance.
Not every geyser requires the same service. Tankless water heaters, gas geysers, and electric storage geysers have different internal designs, so the correct cleaning procedure varies.
Should you use vinegar to clean a geyser?
Do not pour vinegar into your geyser or introduce it through a pipe as a DIY descaling method unless the manufacturer specifically approves that procedure for your exact model.
Acids can affect certain metals, seals, coatings, and other components. Using the wrong concentration or leaving a chemical inside for too long can cause damage.
Likewise, never mix cleaning chemicals. Bleach, toilet cleaners, drain cleaners, and improvised acid mixtures should not be used inside a water heater.
For internal descaling, use only the procedure and products approved by the manufacturer or recommended by a qualified service professional.
How Often Should You Clean a Geyser?
There is no single cleaning schedule suitable for every geyser. The correct interval depends on the model, water hardness, amount of use, installation conditions, and manufacturer’s recommendations.
| Maintenance task | Suggested approach |
|---|---|
| Exterior dusting | Whenever the casing becomes dusty |
| Visual inspection for leaks | Periodically, and whenever you notice a change |
| Checking unusual sounds or heating changes | As soon as the symptoms appear |
| Internal descaling or sediment flushing | According to the manual and a technician’s assessment |
| Safety-device inspection | At the manufacturer’s recommended interval |
| Gas appliance servicing | According to the manufacturer’s schedule and applicable safety guidance |
If you live in an area with hard water, internal deposits may develop more quickly. Ask the manufacturer or service technician whether your model needs more frequent inspection.
Do not open a sealed appliance or remove safety components just to follow a generic online cleaning schedule.
Signs Your Geyser May Need Professional Cleaning or Repair
Watch for the following warning signs:
Water takes longer to heat: Mineral buildup may be one possible cause, but a faulty thermostat or heating element can produce similar symptoms.
Popping or rumbling noises: Sediment or scale may be involved, but a technician should identify the actual cause.
Reduced hot-water supply: This may relate to sediment, a component fault, or another plumbing issue.
Rust-coloured water: Corrosion in the tank, pipes, or another part of the water system may be responsible. Do not assume that flushing alone will solve it.
Water leakage: A leak may come from a connection, valve, or tank. A leaking tank may require replacement rather than cleaning.
Repeated tripping of the electrical protection: Stop using the appliance and arrange a qualified electrical inspection. Do not repeatedly reset a tripping circuit.
Gas smell, soot, or signs of poor combustion: Stop using the gas appliance and follow the manufacturer’s emergency guidance. If you suspect a gas leak or carbon monoxide exposure, leave the area and contact the appropriate emergency service. Do not attempt to clean the burner or flue yourself.
Electric Geyser vs Gas Geyser: Are Their Cleaning Methods the Same?
No. The exterior can often be wiped carefully on either type, but internal maintenance differs considerably.
Electric geyser
Electric geysers contain electrical components and may have a storage tank, heating element, thermostat, and safety devices. Internal servicing can involve electrical isolation, draining, and access to components.
Never operate an electric storage geyser when its tank is empty. Follow the manufacturer’s instructions for refilling and confirming the tank is full before restoring power.
Gas geyser
Gas geysers use combustion to heat water. Safe operation depends on correct installation, adequate ventilation, an appropriate flue where required, and properly functioning gas and safety components.
Do not remove burner parts, adjust gas settings, or clean the flue yourself unless you are specifically qualified and authorised to do so. A qualified gas-appliance technician should handle internal servicing.
If you are not sure which type of geyser you own, check the model label and user manual before attempting maintenance.
Common Geyser Cleaning Mistakes to Avoid
Avoid these common mistakes when maintaining a water heater at home:
- Cleaning while the appliance is hot: Hot water and components can cause serious burns.
- Spraying water onto the controls: Moisture can damage electrical components and create a shock hazard.
- Opening the geyser without proper isolation: Internal work may involve electricity, hot water, pressure, or gas.
- Using unapproved chemicals: The wrong cleaner may damage seals, metal parts, or the tank lining.
- Blocking the safety-valve discharge: Safety outlets must remain unobstructed and be installed as specified by the manufacturer.
- Ignoring repeated electrical trips: This may indicate an electrical fault and should be inspected.
- Trying to repair a gas burner without training: Incorrect servicing can create fire, gas-leak, or carbon monoxide hazards.
- Assuming every noise means scale: A technician should check persistent or unusual noises rather than relying on guesswork.
Tips to Keep Your Geyser Clean for Longer
A few simple habits can help you look after your water heater:
- Keep the exterior clean and dry.
- Check for visible leaks and signs of corrosion.
- Follow the manufacturer’s maintenance schedule.
- Ask about water hardness if you repeatedly experience scale buildup.
- Use only approved cleaning products and servicing procedures.
- Keep required ventilation around a gas geyser unobstructed.
- Do not tamper with safety valves, thermostats, wiring, or gas controls.
- Keep the model number and service records handy.
- Arrange professional servicing if heating performance changes or warning signs appear.
These habits will not prevent all scale or sediment buildup, but they can help you identify issues and maintain the appliance according to its design.
Frequently Asked Questions (FAQs)
1. Can I clean a geyser at home myself?
You can generally clean the exterior using a soft cloth and suitable mild cleaner, following the manufacturer’s instructions. Internal tank cleaning, descaling, or component removal may require a qualified technician.
2. How do I remove limescale from a geyser?
Internal limescale removal depends on the appliance design and the manufacturer’s approved procedure. A qualified technician can determine whether descaling or component replacement is needed and use a suitable method.
3. Can I use vinegar to clean my geyser?
Do not introduce vinegar into the geyser unless the manufacturer explicitly approves it for your model. Acids can damage some metals, seals, and coatings.
4. What happens if a geyser is not cleaned?
Depending on the water quality and appliance, mineral scale or sediment may accumulate and affect heating performance. Neglected maintenance can also allow leaks, corrosion, or other faults to go unnoticed.
5. How often should an electric geyser be serviced?
Follow the manufacturer’s schedule. Water hardness, usage, and the specific model affect the maintenance interval. Ask a qualified technician whether your appliance needs internal descaling or other preventive maintenance.
6. Why is my geyser making a popping or rumbling sound?
Sediment or mineral deposits may be one cause, but other problems can produce similar sounds. If the noise is persistent, new, or unusually loud, switch off the appliance if safe and arrange an inspection.
7. Can I clean a gas geyser at home?
You can carefully clean its accessible exterior according to the manual. Internal gas components, burner assemblies, and flues should be inspected or serviced by a qualified professional.
8. Does cleaning a geyser reduce electricity consumption?
Removing heavy deposits may improve heat transfer in some appliances, but savings are not guaranteed. Energy use also depends on the thermostat setting, insulation, hot-water demand, appliance condition, and household habits.
9. Is it safe to open a geyser to remove sediment?
Not without the appropriate training, equipment, and model-specific procedure. Opening a water heater may expose you to hot water, pressure, electrical hazards, or gas-related risks.
10. What should I do if my geyser leaks after cleaning?
Stop using the appliance if it is safe to do so, isolate the relevant supply according to the manufacturer’s instructions, and contact a qualified technician. Do not turn on an electrical geyser if water may have entered electrical components.
Final Thoughts
Cleaning a geyser at home does not always mean opening it up and removing the heating element. For routine care, a careful exterior clean and a visual check for leaks or damage are useful first steps.
If you suspect internal limescale, sediment, corrosion, or a faulty component, use the manufacturer’s maintenance instructions and arrange professional servicing where needed. The right approach depends on whether you have an electric storage geyser, a tankless water heater, or a gas geyser.
A little regular care can help you spot problems early, keep the appliance in better condition, and make safer decisions about when professional maintenance is necessary.
Disclaimer: This article provides general home-maintenance information and is not a substitute for the manufacturer’s instructions or professional servicing. Water heaters can involve electricity, hot water under pressure, gas, and combustion hazards. Do not dismantle internal components or attempt repairs beyond your training.
SHARING IS CARING 💖